

From Apartment Therapy

CRAFT OF THE DAY
Outdoor Canopy
 Create a cool spot for summer living with one of our easy canopies.
All by itself, a simple canopy can turn an empty space outside into a "place." While trees might take years to grow, an expanse of cloth goes up in minutes, providing shade wherever you need it most. When the outdoor season ends -- or a storm whips in unexpectedly -- you can take it down, quick as a wink.
Unlike a pricey pergola or arbor, which demands a permanent surrender of ground, a canopy requires scant commitment or expense. For the most basic version, spend a few dollars on a drop cloth from a hardware store, and a few more on the supplies you will need to suspend it overhead: a grommet kit, tent poles, stout cord, and sturdy pegs. These ideas can be modified for other settings and styles.
You can sew a canopy yourself, or have one stitched by a seamstress or sailmaker. You'll need a few things from a hardware store, garden center, or camping-supply store to put up the fabric you choose. The way you erect the canopy depends on where you want it to be -- it can be suspended from poles, or stretched between a wall or roofline and poles.
Tools and Materials
- A grommet tool makes it easy to punch sturdy holes in the corners of your fabric.
- Plastic tent pegs anchor lines from the tops of poles into the lawn or planting beds.
- An inexpensive canvas drop cloth can serve as a fine canopy.
- Stout clothesline or venetian-blind cord will keep a canopy in place.
- Wooden pole with dowel pin or bamboo pole with dowel
- Adjustable aluminum tent poles can be raised or lowered to fit your setting.
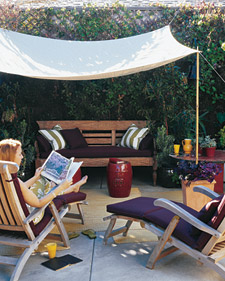
Attached to a Wall or Fence How-To
At a corner of the canopy near the house, a short length of cord extends from the grommet to a screw eye on the house. At its apex, the tent is anchored to the center pole; two cords tied to the top of the pole are pegged to the lawn. There is also a cord anchoring each of the shorter poles that support the sides.
To fashion a patterned tent, sew together two full-size lightweight cotton bedspreads, creating a reinforced 2-inch overlap in the center. Punch grommet holes in the corners, and one on each end of the center overlap. Cut a third bedspread to make full-length, 6-inch-wide border strips. Stitch one to either side of the fabric, which adds hanging borders. To put up the peaked canopy, use a tall pole for the center and shorter poles for either side; attach screw eyes in corresponding spots on the house.


Free-Standing Canopy How-To
If you don't want to secure the canopy to a wall or fence, create a free-standing one with four poles. You'll need four people, too. Start by installing a metal grommet at each corner of your canopy fabric. Stand four poles with long, thin tips (use tent poles; drill a wood pole so it holds a dowel pin or fit bamboo, which is hollow, with a dowel) on the ground. Hook the grommets over the tips. Then have each person simultaneously loop sturdy cord around the tip of his or her pole and stake the other end of the cord into the ground several yards away.
Tips
- Cut openings that allow wind to circulate through
- Grommets at the corners of the fabric fit over poles in front and are tied to screw eyes on the house
- Loop cord around the poles to keep the fabric in place and attached to pegs in the lawn for added stability
- Tie extra fabric to the cords to make them more visible so no one will trip over them
- Canopy poles get added stability by fitting them into lengths of PVC pipe and sinking the pipe into soil-filled terra-cotta pots
- Painted wooden dowels and colored cord make the canopy's mechanics part of the picture
- Take the tent down when not in use to discourage fading

1 comment:
Definitely filing away this idea, love the look of a simple white one. I keep dreaming up ideas for our future deck...you guys must be excited!
Post a Comment